4 tips and 4 mistakes to avoid when repainting your furniture
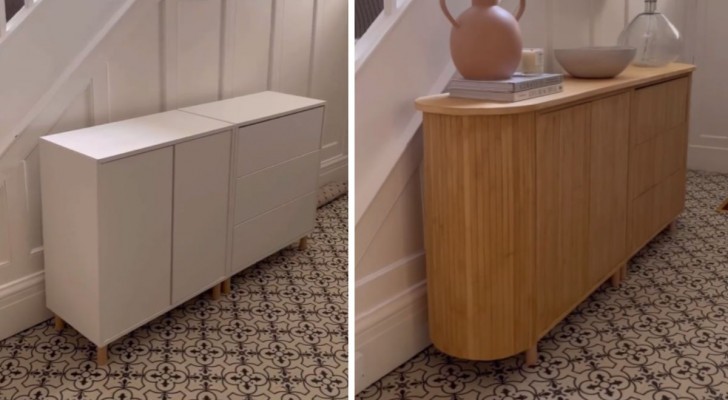
When you decide to renovate your home, you need to be ready to incur expenses and moments of great chaos. That said, you can completely change the look of some rooms simply by repainting any old, worn-out furniture. It's amazing how simple it is to make the atmosphere of a home feel more modern and welcoming simply by renovating the furniture.
When repainting furniture, however, there are a number of rules that must be strictly adhered to if you want to do a good job; knowing these rules before starting is of fundamental importance, not only to guarantee an excellent final result, but also to avoid making any unnecessary effort.
We list below 4 things to do and 4 mistakes to avoid when preparing to renovate your furniture:
Things to do
There are 4 things to keep in mind when it comes to repainting old furniture:
- Prepare the furniture before painting: a fundamental step to protect all the parts from any damage. So, remove all drawers, cushions and metallic fittings. This will ensure these components do not get ruined by paint drips or splashing. Finish this preparation by cleaning your furniture of all traces of dirt, making sure to carefully remove all traces of cleaning products and/or waxes and then dry off thoroughly.
- Sanding the furniture: this operation is essential for the success of the entire paint job (unless you are going to repaint a pristine, already-painted piece). In the case of rusty metal furniture, the first thing to do is scrub it down with a wire brush. For non-rusted metal or wood, go straight to sanding it. This operation can be done by hand with sandpaper, but this takes a lot of time and effort. For a faster, effortless job, use an orbital sander. Start with an 80 or 100 grit sandpaper, working up to a 150 grit. A belt sander is great for use on large pieces of furniture.
- Remove dust after sanding: this step allows you to ensure the paint and primer will adhere better to the furniture. Ideally, use cotton gauze or loosely woven cloth dipped in a sticky substance such as resin or beeswax. Alternatively, a damp cloth followed by a dry cloth will work. Pass a vacuum cleaner over the piece to remove any residue before starting to paint.
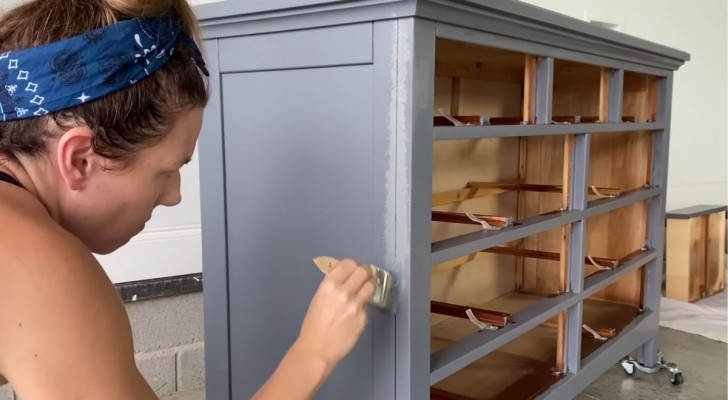
- Apply the paint in several layers: once the color has been chosen, it's time to apply it. Apply a thin layer first, followed by several successive layers, which will allow you to obtain a smoother and more uniform finish. Longer brush strokes will also contribute to a smoother finish. Drying time varies depending on the paint but is usually around 4 hours. Allow each coat to dry thoroughly before applying the next, continuing with the applications until the desired finish is obtained.
4 mistakes to avoid
Here are the 4 most common mistakes to avoid:
- Don't forget ventilation: paints contain irritating, volatile chemical compounds, which is why it is of fundamental importance to work in well-ventilated places, preferably with the windows open to limit breathing the compounds in. Take frequent breaks in the fresh air and, if possible, use a fan or air purifier. At any hardware store you can also easily find painting masks which will protect your respiratory tract.
- Don't forget the primer: essential to seal the surface and improve the durability and adhesion of the paint, you will need a water-based primer for wooden furniture, spreading it in the direction of the grain (an oil-based primer will be needed for metal furniture). Wait at least 10 minutes for the primer to dry before proceeding with the next coat. At least 2 coats of primer will be needed before proceeding to the main painting job.
- Don't forget to color proof/test: it is, obviously, important to make sure that the color paint you use is the right one. You can make sure of this by testing it on a piece of cardboard and, once dry, placing it where you will put the piece of furniture. Prepare a swatch for each color if you are not 100% sure. If, on the other hand, you want to test the paint directly on the piece of furniture, apply a small amount to hidden area, such as the inside of a drawer or the back board.
- Don't forget to apply a protective finish: this is especially important for outdoor furniture. The finish will help protect your work and ensure it lasts longer. Spread the finish over the piece in several layers using a paint brush or roller (for bigger pieces). Drying times vary - usually from a few hours to a few days, depending on the brand.
Now you are really ready to renovate your furniture!