IKEA hack: how to transform PAX wardrobes in just a few steps

The furniture giant IKEA sells furniture at competitive prices and has many versatile designs which are enjoyed in many parts of the world. This make IKEA a useful outlet for who want to furnish their home without necessarily having to spend a fortune. However, the extreme popularity of this brand also has a small disadvantage for some: the fact that many, many people will have the identical furniture pieces. In reality, the characters of our homes are largely defined by our furniture and fittings. But thanks to a myriad of ideas for customizing IKEA furniture, you can still enjoy unique pieces.
Among those destined to become wardrobes for clothes, shoes and accessories, the models from the PAX line is very well known. They have basic shapes and a glossy finish that can be modified - just enough to make it your own. Read on to find out more about DIY enthusiast Emma Courtney's bespoke makeover method.
via emmacourtneyhome/Instagram
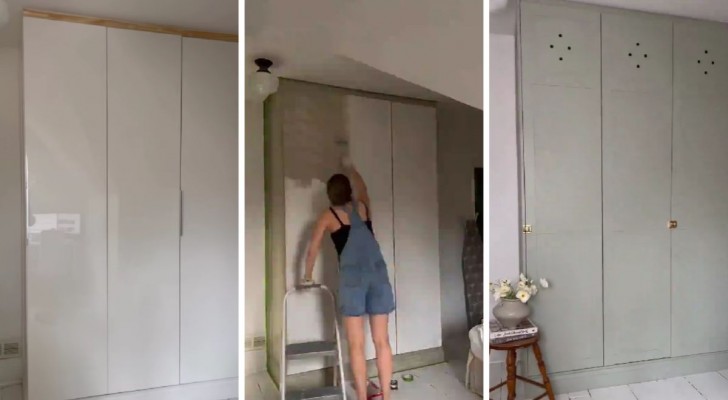
As she shows on Instagram (and also explains on her website), Emma took her inspiration from another hack she saw online. This prompted her to transform some PAX units into a closet and then, building on the success of her first project, she decided to build a full bedroom wardrobe.
To full the full wall, Emma added a base and a top (or "crown). As Emma advises, however, it may be sufficient just to some drawers to the top and without necessarily building the unit all the way up to the ceiling.
The choice of paint was also fundamental. The paint Emma chose leans towards sage green, but has a tinge of grey.
Another key detail are the holes drilled into the upper portion of the doors, which prevent the accumulation of humidity but without leaving the contents exposed.
Furthermore, the doors have been enhanced with moldings and attractive handles, positioned differently according to the height (in the center on the two-door cabinet, on the side on the one-door cabinet). You can see a quick montage of the transformation in the video below. But if you really want to know every secret in the tutorial, you'll find all the details by clicking on this YouTube link.