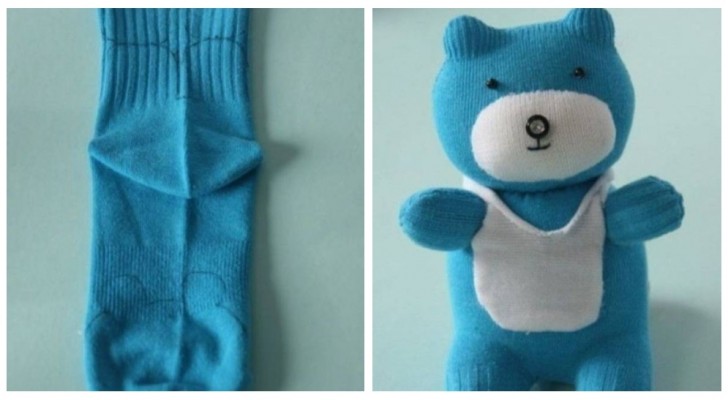
Turn an old wool sock into an adorable teddy bear
An old object like a sock that is no longer used or that has lost its' matching mate is something that we usually only think about throwing away. But with a little creativity, it can be transformed into something that will stay in the house for much longer. In fact, it is possible to cut it and sew it back together so that it becomes a very cute stuffed teddy bear, which can then be customized with accessories as desired to personalise it as we wish.
This is a rather simple sewing project, also suitable for those who are not great with needle and thread, and which is indeed fantastic for getting a little practice. It can become an adorable gift for children, or even a decoration for the bedroom or for some party - such as baby shower - or a keep-sake for some special occasion. Read on to find out how to do this:
What you will need:
- A wool sock (not too frayed)
- Synthetic or natural padding, as you prefer. Even some rice might be fine too!
- Needle and thread - possibly of the color closest to that of the sock
- Scissors
- Tweezers
- Cotton gauze (or scraps of an equally light fabric, white or the color of the sock)
- Buttons and beads for eyes and nose
- A grease pencil or chalk to trace the lines to cut on the sock
How to proceed:
- Flatten and spread the sock on a work table, so that the heel is centered on the side facing you.
- Draw the shape of the head with the ears at the tip of the foot, while towards the edge, you will draw the 4 paws.
- Cut out the pieces.
- Cut an oval piece off the base of the head and sew the edges up to the ears. The opening made with the cuts will be used to insert the padding.
- When you have filled the head very well, use a piece of cotton gauze to close the base of the head.
- Sew the edges of the body with the "legs" of the bear, and fill them with stuffing. Then close the opening (the "neck") like a bag and sew closed.
- Now fill the two "arms" and close them just as you did with the "neck".
- Assemble the various pieces together using stitches to sew the bear together.
- Use buttons and beads to draw the lines of the muzzle and to create the eyes.
You can add any accessory you want, or even use two different socks to have the head a different color from the body and so on. Great job!