How to bind an old book: the step by step method to save it from the rubbish bin

We all have objects in the house that remind us of past times, our childhood, special moments of our life, a special gift from a special person. These objects occupy a special space in the folds of our soul because they have left us in a unique and unrepeatable emotion, which has changed and transformed us forever. Among these objects, certainly include books. Whether you read a little or a lot, we all have some at home gathering dust on a piece of furniture, and some of those we have owned for a long time will surely need to be "saved", before the cover or pages slip away due to time, wear, of super-use. How can I save them from breaking before buying a new copy?
We will explain the two steps to binding old books with clarity and simplicity, replacing only the spine or the cover ...

The tricks to repair only the spine
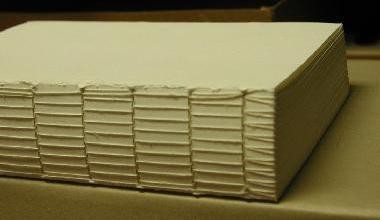
First remove the original spine. All you need is a cutter to engrave the cover, front and back about an inch from the spine itself. Avoid scoring along the hinges, as they only connect the cover to the text block the book is made of. Use a paper fold and finally remove the spine from the body of the book. After that, you will need to measure the spine you just removed, if not, measure the space between the hinges of the text block. Then cut a piece of cardboard or rigid white sheet to report the measurements of the spine to be replaced.
Prepare the fabric for the new spine by choosing a piece of cotton or burlap that matches the overall color of the book. Take the measurements corresponding to those of the back, and add two centimeters in length and four in width to the piece of fabric then cut it using these dimensions.
Add the spine to the book cover. Cover the back of the spine with book glue, and place it in the center of the book cover. Cut the corners of the fabric at an angle of approximately 45 degrees, and add glue to the bottom end of the cardboard. Fold back the top and bottom ends of the cover and apply strong pressure, then, remove the glue from the old spine that you no longer use. Use a utility knife, and remove the glue from the text block, which was previously joined by the spine. Next, prepare the book for a new outer spine by placing it with the side of the spine that interests us facing up. You can use bricks to hold it in place and glue a paper backing to the pages so that they stay still.
Place the new spine and then glue onto the exposed fabric of the new spine. Cover everything with glue and then press the liner firmly onto the cover. Let it dry completely and finally, place the finished book among several books or in a press overnight so that it can dry faster and correctly. To prevent the pages from sticking together, you can simply put a piece of wax paper inside the cover.
The tricks to repair the whole cover
The first thing you should do is check if the current book cover is mostly stuck or sticking for a while; in this case, what you have to do at first is simply remove the cover and spine from the body of the book; to do this, help yourself with a cutter with a working blade to remove the glue that has remained in excess, or the pages that have been torn, or those that come out of the book itself. Then, to take the measurements of the new cover you can choose two options: either take the measurements of the old cover you just removed, or the measurements of the text block itself; in the second case, however, remember to add an inch of height. Afterwards, the new covers have to be cut out; to do this you have to use the measurements just taken to cut out three pieces from a sheet of stiff paper to obtain the two pieces of the new cover and the new spine.
Let's move on to the book covering phase. At this stage you have to choose a piece of cotton or canvas to build your cover, then place the three pieces of rigid paper sheet that you have already made on the fabric of your choice, with a minimum difference between the cover and the back, while around the entire cover you have to measure about two centimeters, and finally cut the fabric that you will see that now will have the shape of a very large rectangle.
Finally now you can create your cover. Add a layer of glue to the back side of the cardboard cutouts you've already made, and place them where they were when you measured the fabric. Cut out the lower part and the upper part of the fabric at a 45 degree angle, and fold the ends of the fabric inside the two covers. Add a lot more glue to the inside and then sew the remaining pages. Always remember that the new cover needs the final pages to act as a glue between the cover and the body of the book itself, for this reason you need to use a double and very resistant type of paper for the pages that are at the end of the book. Now you will need a needle and thread; use a needle to weave the thread between the new final pages and the older parts of the book and then add the new cover. Put a thick layer of glue on the inside of the cover, and place the body of the book on the back. Refold the front end page and repeat the same process with the back cover.
Finally, you can dry the cover. You can put the book in a book press or squeezed neatly between multiple books overnight to let it dry completely. To prevent pages from sticking together, you can always use a piece of greaseproof paper between the end pages and the block of text.
Some practical tips:
The procedures we have just listed, whether to remove the damaged spine or to replace the back and cover of an old book and bind it again, are advisable if you have more than one to modify or to put your hand to; in fact, you don't necessarily have everything you need at home to be able to bind an old ruined book you care so much about. For this reason, if it is only a single book, it is advisable to contact a publishing and bookbinding professional to save money on the purchase of materials that you may need. Otherwise, if you have time and ingenuity to get home and spend some free time saving your favorite books, you just have to follow all the procedures we have listed above; you will need the material, sure, but if you apply it to the letter, you may have brand new and almost customized editions in your library.
But, despite everything, the procedures we have just explained to you are not difficult at all if you have the desire and time to save some literary edition to which you think you are very attached or that you have read and reread until it has practically ruined or consumed it. For these objects so precious and full of knowledge and information, we believe that putting our hand to improve them can be really worth it!