7 vegetables that you can grow from kitchen scraps: perfect project to do with kids
Consuming vegetables is the basis of any healthy diet in any part of the world, and we often consider it a duty, but when we eat vegetables grown by ourselves it also becomes a small, completely personal pleasure, especially if we have managed to obtain tasty products with our efforts, and even more when we managed to grow a plant starting from kitchen waste.
There are some vegetables, in fact, that we can grow at home starting from scraps or simply from a product purchased at the market or at the supermarket, without therefore having to look for seeds or plants already grown to be planted in our gardens or balconies.
Even if we didn't have the time and the way to give life to a small personal cultivation in this way, it could still be a fun experiment to do with children, to discover the magic of nature capable of regenerating itself.
Romaine lettuce
Romaine lettuce is one of the most common salad plants, with which we can also prepare vegetable broths or soups, and in Eastern and Middle Eastern cultures, salad leaves like this are used to wrap food in order to create a roll full of flavors to eat in one bite.
When we consume it, we generally take the leaves and leave the base of the head, which is thrown in the garbage or perhaps added to the compost pile. From that waste, however, it is possible to regrow a new plant.
In fact, if the lettuce was still fresh enough at the time we ate it, it takes very little to start growing a seedling from that base. You can try it in two ways:
Directly burying the bases of the head (always with the part that was previously connected to the leaves upwards) in a pot with rich earth, immediately watering a little and placing the pot in the sun;
Pouring a little water into a tray or bowl and leaving the cut head immersed so that the lower part is lapped by the water, but without submerging it all, so a couple of fingers of water should be fine.
In both cases it is necessary to water to keep the soil moist or top up the water so that it always remains at the same level for about 10 days. After that period of time, new leaves should appear.
At that point, if the plant was already in the ground, continue growing it by watering when the soil dries up. If, on the other hand, you had grown the plant in water, it is time to bury it, taking care to let the new leaves sprout and place the pot in a sunny spot and then continue growing as in the other case.
Carrots
Carrots are another fairly simple vegetable to grow; we always eat the root of the plant, but the leaves are also edible: they can be used to season pasta (a bit like with turnip greens!) or to make a vegetable pesto to accompany other dishes. Just look for a few recipes with carrot leaves to discover a different and pleasant taste, and if by chance we liked it, the good news is that we can regrow carrot leaves from kitchen scraps!
In fact, you must always select fresh carrots, preferably if they still have some leaves attached to the top, and cut the top of the carrot about 5 centimeters below the leaves. Place the tops of the carrots in a tray or pan with high sides, with the flat side (the cut one) in contact with the bottom, then add water to cover half of the carrot sections. Leave everything in the sun, perhaps on a windowsill, and top up the water whenever necessary, without exaggerating. Within a week or two, you will see new leaves appear.
At that point you can bury the carrots, taking care to leave the green part out of the ground, and then you will collect the leaves when you prefer: there are those who prefer to consume the sprouts, those who let them grow longer.
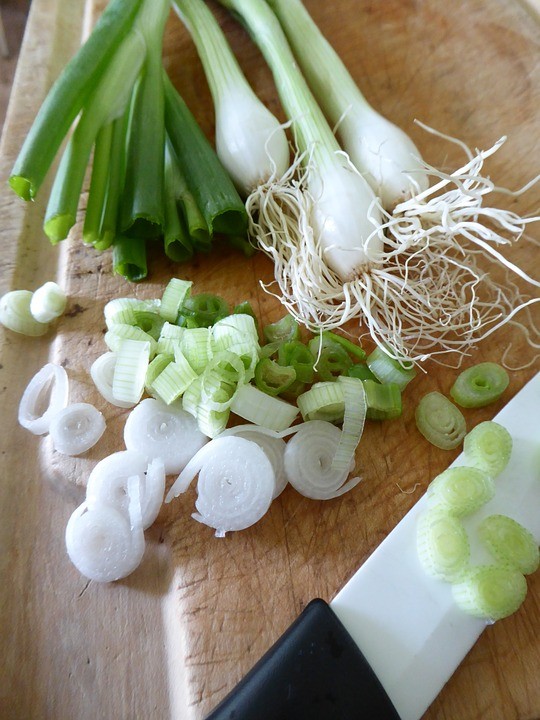
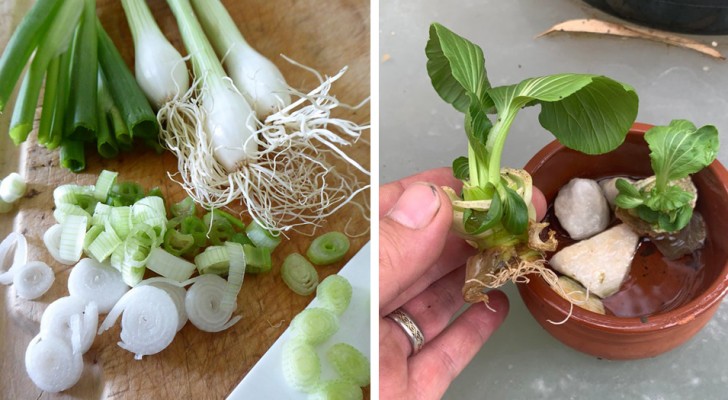
Green Onions, Onion and Leek
Green onions (or spring onions)
Like leeks, they are onions that we consume fresh, so they always have a green part on the top that is still quite turgid at the time of purchase. Even that can be consumed, if it still retains humidity inside. However, when we wait a little too long to eat them and they remain in the fridge for a few more days, we notice that the leaves on top lose their vigor. If we don't want to eat them in time, we could try to re-grow some onions from the very ones we had.
The green part must be eliminated, cutting so as to leave about 4 cm of bulb at the bottom, or a little more. Take the various bulbs thus cut and put them in a glass placed in a sunny spot, adding water to cover the bottom of the bulbs themselves (about 2 cm), so that they always float a little and do not reach the bottom.
Top up the water every day so that the level never drops too much, and cut once again the first green leaves you see growing back (this step is not necessary). After about ten days you will see that roots have grown and you can move them to the ground.
However, there are those who do not use the water culture method and put the onions directly - deprived only of the green part of the leaves - in the ground, in a soil rich in humus. Water in order to have a moist but not wet substrate, because water stagnation must be avoided, and after a week you will notice that they have produced new green leaves.
With leeks we proceed in the same way, therefore using only the white base, cut about 3 or 4 cm from the bottom, and when you see the roots sprout, move everything to the ground.
Onions
Have you ever not eaten the white, yellow or red onions left in the kitchen in a hurry and noticed after some time that they had produced green buds from the apex? If they succeed with the simple humidity of the air, imagine how they can grow quickly if placed in water and on the ground.
To make them grow in this way, therefore, they must be cut in half horizontally, i.e. separating the top from the bottom. The half we don't use for cultivation we can consume normally. Cutting in half helps, but you can also try to cut only the third near the bottom, that is, a little more than what we generally discard when cooking.
This portion of onion can be rooted in the ground, but there is a very important step to do first: that is, let the cut part remain to dry in the air for a few hours, so as to "heal" the cut a little. When the cut seems dry to the touch, place everything in a jar filled with rich but well-dissolved and draining soil, covering the onion with a couple of fingers of soil and watering a little.
When you see that some leaves have sprouted, gently remove all the onion from the jar, leaf through the outermost leaf, and if you realize that two plants different from the original bulb portion are growing, separate them by cutting them lengthwise with a knife with a sharp and sterilized blade. .
Plant in the pot where you want to grow the onions, shortening the leaves to a third of their height and water when the soil becomes dry. What you will get will essentially be spring onions!
Garlic
The growth of buds is a phenomenon that we can also notice in cloves of garlic that have been forgotten for too long, and in fact even this bulb can be easily grown at home. Also in this case, we end up with edible green leaves, a bit like aglina herb, to be used to season many different dishes, such as soups and stews and more.
Put the cloves in a bowl in the sun with a little water, without submerging them and remembering to top up the water just like in the other cases; after a few days you will see the roots sprout from below.
When they are an inch or so long you can move the bulb into the ground, leaving the bud out of the ground and watering regularly but without overdoing it. There are also those who continue to grow them in water without ever putting them in pots.
In any case, the leaves can begin to be consumed when they exceed 7-10 cm in height.
Celery
Just like lettuce, the base of a celery head can be used as a sort of cutting of the plant. You need to cut the base about 5-7cm in height, removing the leaves (which you can obviously use for cooking), and then place it in a pan or tray with about two fingers of water.
Within a week you will see that the outermost coasts dry up, while green leaves begin to sprout in the center: when the latter emerge and exceed the cut coasts by a couple of centimeters, you can move everything on the ground, leaving just the leaves out. off the ground. Water regularly to not leave the soil dry for too long, and within a couple of weeks you will see that new stems are produced, and even after months you will continue to have new stems to use in the kitchen.
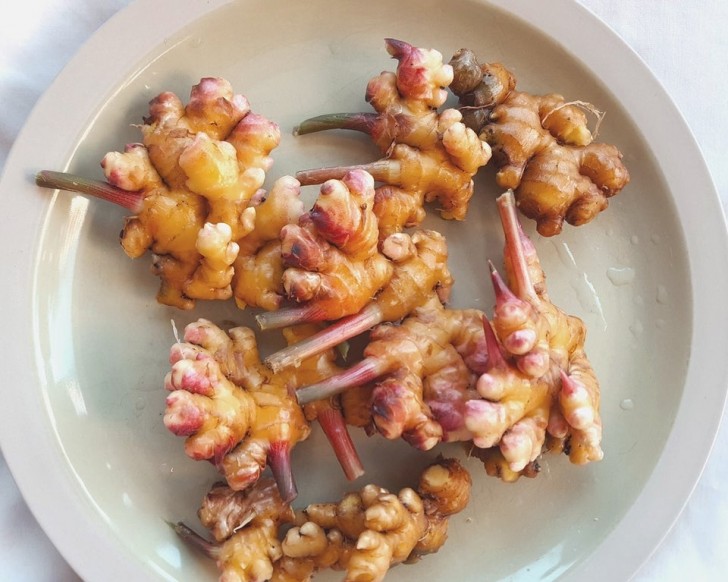
Ginger
The best time to start growing ginger is generally the beginning of spring or just before, but if you ensure a series of temperature and light conditions, you can also try it at other times of the year.
When choosing the rhizome to plant, look for one that has visible eyelets, or those small protuberances (like small bubbles) that indicate the points from which new shoots should start. Furthermore, the rhizomes must be fresh and turgid to the touch, so discard those that seem soft or dehydrated and empty inside.
Once the rhizomes have been selected, put them in water overnight (but no more), and the next morning fill a fairly large pot (30 cm in diameter is fine) with well-dissolved soil and bury the rhizomes at a maximum of 10 cm. depth. As for the direction in which to place them, there are two schools of thought: some say they go with the eyelets down, some up. Considering that it is from these that sprouts will sprout, it seems more sensible to point them upwards.
Put the pot in a shady but warm place: then a hot spot facing north or a shady spot facing south, and remember to always keep the soil a little humid, reducing irrigation from late summer / early autumn , when you can also let the soil dry out between waterings. Under the right conditions, ginger grows to a maximum of 60-90cm in 6 months.
When you want to harvest it, you will have to take the plant by the collar and pull up firmly but not abruptly, taking all the rhizome. If you want to use only a piece of the root, cut it with a sterilized scissors, putting the rest back on the ground and leaving it to rest for at least a month before removing it.
Would you like to try growing these plants indoors?